With the release of the 12.0 version of LefthandOS on the StoreVirtual platform, one of the long attended features was the intelligent MPIO which was already available for Windows (DSM MPIO) but not for VMware.
Currently the Manager function on the storage nodes in the cluster owns the knowledge of which data block is placed on which node (see my article on Network RAID to understand better).
By enabling the MEM module this ‘map’ is transferred to the server host. This results in a better performance since the host can now directly go to the concerned node without bothering the so called gateway connection. HP claims 5 to 20% better performance depending on the amount of nodes in the cluster. It is obvious that with only 2 nodes you will get less benefit of the multiple paths…
To enable the intelligent multipathing on VMware there are 2 actions to do:
1 – update your cluster to LefthandOS 12.0
2 – install the MEM on your VMware 5 host
LefthandOS 12.0 installation:
First we need to update the LefthandOS to the latest version 12.0. This is done through the CMC Centralized Management Console that manages your cluster.
First you update the CMC itself to 12.0. Since this is a Next-Next-Finish install no screenshots. If you don’t get it, contact me… 😉
Then the storage nodes will be updated 1 by 1, to avoid downtime.
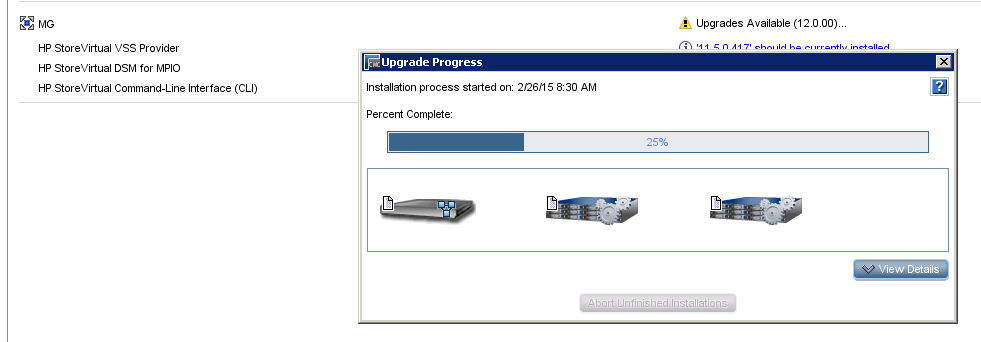
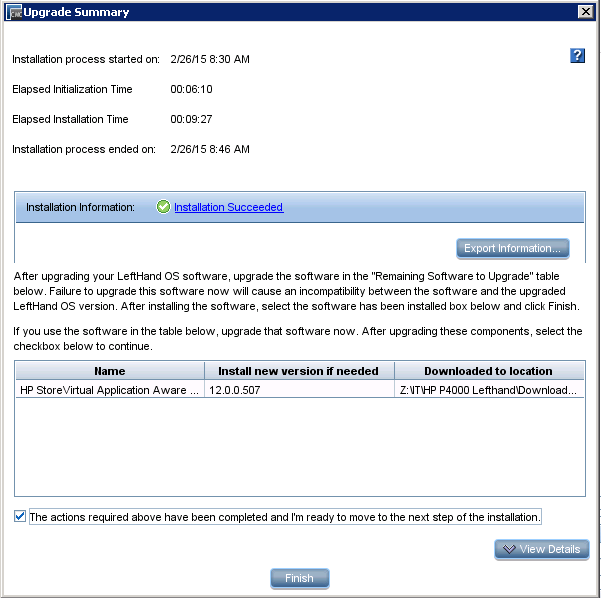
When finished (time depends on the number of nodes) you will get a summary of the installation and some post-tasks like updating the CLI, VSS and SRA integrations.
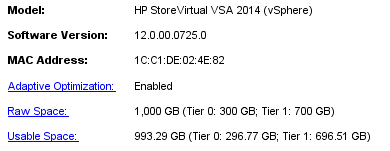
When you go to the properties from your storage systems (in my case VSA’s) you will see the software version being 12.0…
MultiPathing Extension Module installation:
Second we need to install the MEM on our hypervisors itself. This can be done through VMware Update Manager or via SSH on the host itself.
Since the ZIP¨file was not available yet on the HP VIBSDEPOT for VUM, I chose to install the MEM directly on the host via SSH. The VIB file can be found on the HP Software Depot in the storage section.
First let’s take a look at my current setup and how the install of the MEM will change the behavior of my storage cluster.
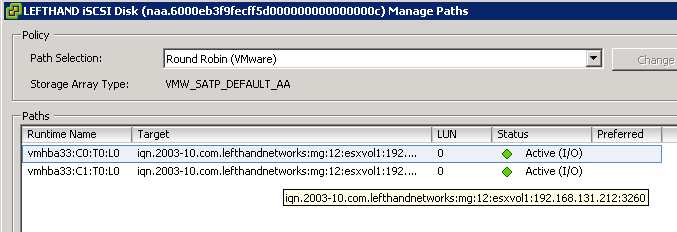
I have 4 hosts connected to 1 LH volume on 2 VSA’s and 1 FOM (for quorum reasons). When I check the iSCSI sessions tab of my volume I see this:
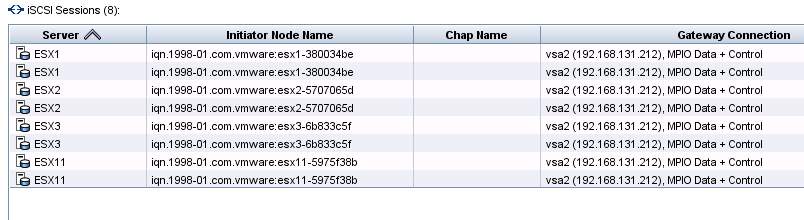
Since I set the MultiPathing policy for this volume to RoundRobin (which is a best practice) I see 2 iSCSI sessions (from each VMkernel, 1 per physical NIC in the server, again best practice).
Now let’s install the MEM. To do this I connect with my SSH client (Putty) to my host. When I follow the MEM deployment guide (which is really straightforward, not going to copy it here) however I get an error that the signature cannot be validated and so the installation cannot continue.
This is easily solved by adding –no-signature-check after the instruction (see screenshot below)
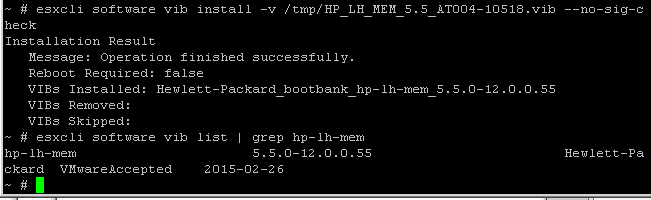
FYI I had to copy first the VIB file to a temporary directory on the host, I used winSCP…
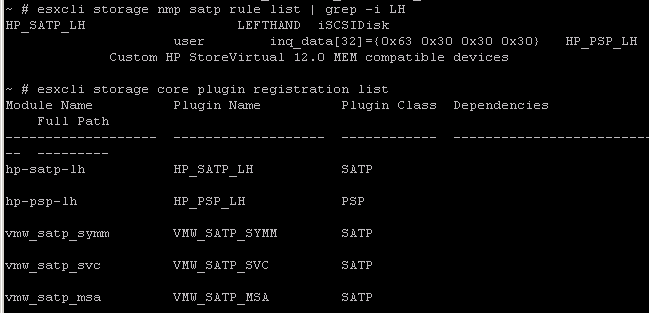
You can validate the succesfull installation by running following command and check the existence of the new SATP called HP_SATP_LH
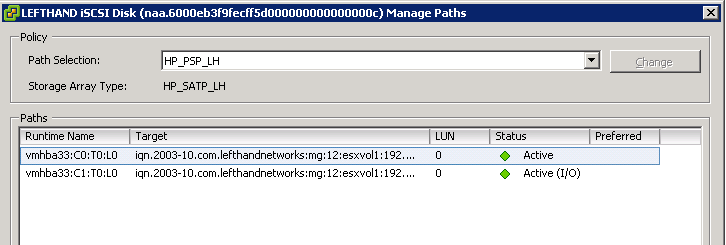
Now I can go to the LH volume and change the Path Selection Policy from RoundRobin to this new SATP. Don’t forget to click the Change button…
When you go check the iSCSI sessions now you will see the real power of this MEM activation.
Similar like the DSM MPIO for Windows I see now a HP MPIO Control (administrative) session and multiple MPIO Data sessions from every VMkernel interface (IP address ending with 143 and 144 in mpy case) to every VSA in the cluster (211 and 212 in my environment)

In this simple 2-node setup I went from 2 to 4 iSCSI data sessions. The real advantage here will be for customers with larger clusters, with more than 2 nodes. They will go from 2 sessions to double the amount of storage nodes in their clusters.
Now you need to do the same installation of the VIB on all hosts connected to your LH SAN cluster.
Be social and share!